Blowing film is the standard way plants turn polyethylene resin into flexible packaging film. The method looks simple from the outside—a tall bubble rising above a circular die—but the film only becomes usable when melt temperature, air pressure, cooling, haul-off speed, and winding stay in balance. This guide walks through the full process in plain production terms: what you need before you start, how each stage works, the quality checks that prevent scrap, and where a production line speeds the same method up without changing the underlying physics.
What “blowing film” actually means
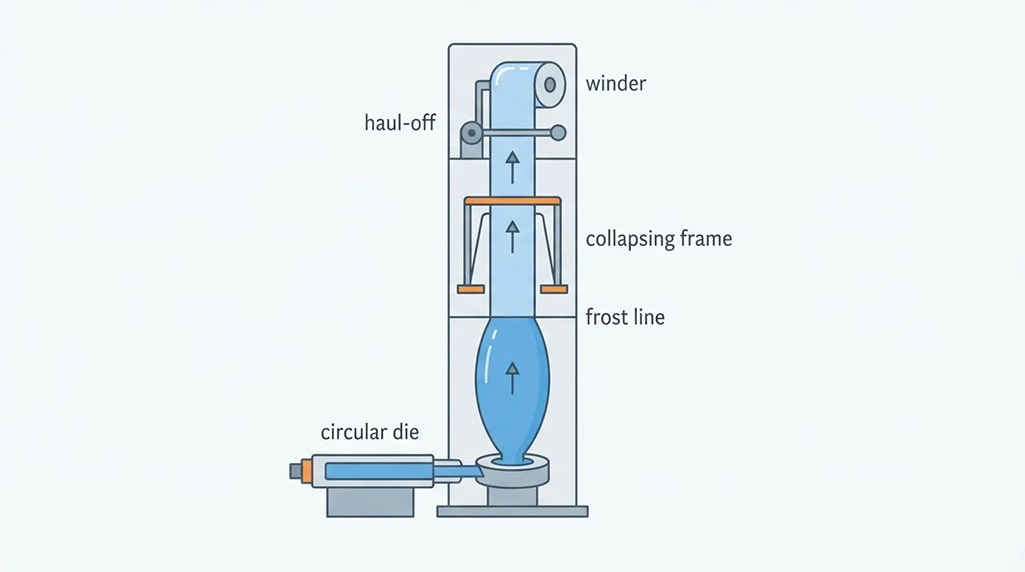
In plant language, blowing film (also called blown film extrusion) means:
Melting plastic resin in an extruder.
Pushing the melt through a circular die so it exits as a tube.
Inflating that tube with internal air so it becomes a thin bubble.
Cooling the bubble until the film sets.
Collapsing the bubble into a flat tube (or later into sheets).
Pulling and winding the film into rolls.
The “blow” step is what separates this process from cast film. Internal air expands the tube after it leaves the die, which orients the polymer in both the machine direction and the transverse direction. That biaxial stretch is why blown film often has balanced toughness and is widely used for bags, liners, shrink film, agricultural film, and many multilayer packaging structures.
You do not need a brand-name machine to understand the method. The same sequence can be explained with hand calculations, lab-scale kits, or a basic mono-layer line. Production equipment only makes the sequence continuous, safer, and more repeatable.
What you need before any run
Whether you are learning the process on paper or preparing a line, lock these inputs first.
Resin and recipe
Choose the resin family for the end use: LDPE for soft clarity and easy sealing, LLDPE for toughness and puncture resistance, HDPE for stiffness and thin bag film, or blends when you need a balance.
Confirm melt flow index, density, and additive package (slip, antiblock, antioxidant, color masterbatch) match the target film.
Dry hygroscopic additives if the supplier requires it. Moisture is a common source of gels and holes.
Record the recipe by weight percent, not “a scoop,” so every later adjustment is measurable.
Target film specification
Write the target before you touch air or haul-off:
Finished thickness (or thickness range)
Layflat width or tube circumference
Roll length or weight
Optical needs (haze, gloss) and mechanical needs (tensile, tear, seal strength)
Whether the product stays as tubing, is slit to sheet, or is converted into bags
Process math you can do without a machine
Two ratios explain most first-pass settings:
Blow-up ratio (BUR) = bubble diameter ÷ die diameter. Higher BUR increases transverse orientation and usually reduces thickness for the same output.
Draw-down ratio (DDR) ≈ die gap ÷ finished film thickness (adjusted for density and any multilayer layer share). Higher DDR increases machine-direction orientation.
Also estimate mass balance:
Output (kg/h) ≈ screw speed × specific output for that screw/resin
Finished film mass must equal melt mass leaving the die (minus scrap)
Average thickness can be checked from roll weight, width, length, and density
If these numbers do not close, the line will “run,” but quality control will fail later.
Safety and utilities
Blowing film involves hot metal, rotating equipment, and airborne resin dust. Before a live run, confirm:
Guards on rotating haul-off and winders
Emergency stops reachable from operator stations
Cooling water, process air, and compressed air available and stable
Clear floor area under the tower and around the winder
PPE for heat and dust
The complete blowing film method, step by step
The steps below are the method itself. A commercial line automates them; a training bench or pilot line still follows the same order.
1. Stage resin and load the hopper
Blend virgin resin and masterbatch to the written recipe. Load the hopper only after the blend is uniform. If you are running multiple components by hand, weigh each lot and mix longer than you think you need—streaks in the bubble often start as poor blending at the hopper.
Without automated dosing, keep a simple lot card: resin grade, lot number, masterbatch percent, time mixed, operator. That card is your first quality record.
2. Heat the extruder and die in zones
Bring barrel zones and the die up on a staged heat profile rather than jumping straight to running temperature. Typical polyethylene profiles rise from the feed zone toward the metering zone, then hold the die hot enough for smooth melt exit without degradation.
Practical checks before screw rotation:
Every zone is at setpoint and stable
Die bolts and heater bands are secure
No cold plugs remain from the previous resin if you changed grades
Screen pack or filter is clean enough for the planned run
If you only have a temperature controller and a stopwatch, still wait for soak time after the last zone reaches setpoint. Cold spots create pressure spikes and gels.
3. Start melt flow and purge
Start the screw at low speed. Purge until the melt looks consistent in color and free of black specks or old resin. Collect purge into a designated container—not onto the floor under the die.
On a basic setup without automatic pressure control, watch melt pressure and motor load while you increase speed. Sudden pressure rise usually means a blocked screen, wet material, or a temperature that is still too low.
4. Form the tube at the circular die
The die turns pressurized melt into a uniform annular tube. Before inflation:
Confirm the die gap is clean and even around the circumference
Center the air ring and bubble guides
Set an initial, conservative air volume so the tube can be handled
A tube that exits thicker on one side will become a bubble with gauge bands no amount of “air chasing” fully fixes. Die cleanliness and even heating matter more than later heroics.
5. Inflate the bubble and set blow-up ratio
Introduce internal air so the tube expands into a stable bubble. Adjust air until bubble diameter matches the target layflat:
Raise or lower BUR deliberately. Do not “hunt” with large air swings. Each air change also changes cooling demand and thickness.
Without fancy sensors, use a measuring tape or calipers on the bubble cage area and convert to layflat. Mark the target diameter on the cage so operators can see drift.
6. Freeze the film with cooling air
The frost line is where the clear melt turns hazy or matte as it solidifies. Cooling air from the air ring (and internal bubble cooling on advanced lines) controls frost-line height.
Rules of thumb operators use on the floor:
Frost line too low: melt is overcooled early; output may be limited and optics can suffer
Frost line too high: bubble is unstable, gauge varies, and blocking or wrinkles appear later
One-sided frost line: air ring balance, die temperature, or ambient draft is uneven
On a simple line, adjust blower speed and air-ring lips until the frost line is level and steady. Block drafts from open doors—ambient air is part of the process whether you planned it or not.
7. Collapse, guide, and haul off
Above the frost line, collapsing frames gently flatten the bubble into a layflat tube. Haul-off rolls pull the film upward at a controlled speed.
Balance these three:
Extruder output
Bubble size (air)
Haul-off speed
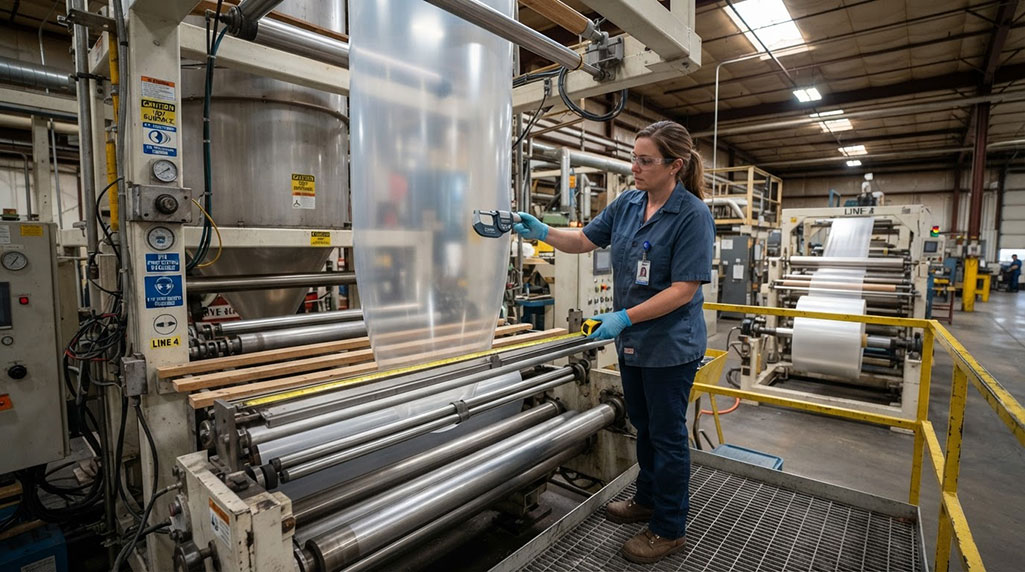
If haul-off is too fast for the output and BUR, the film gets thin and MD-brittle. If haul-off is too slow, the film runs heavy and may not meet yield targets. Manual thickness checks with a micrometer across the web tell you which way to move.
8. Treat, slit, or leave as tubing
Depending on the order:
Corona or other surface treatment may be needed before printing or lamination
Edge guides keep the web centered
Some plants gusset, some slit to single-wound sheet, some keep tubing for bag making
Only add treatment after the web path is stable. Treatment on a wandering web creates patchy dyne levels and downstream print complaints.
9. Wind rolls with stable tension
Winding is where good film is often ruined. Set tension high enough to build a firm roll, low enough to avoid blocking, crushed cores, or stretch.
Check during winding:
If you lack automatic tension control, record dancer position or manual brake settings with each recipe so the next shift can repeat them.
10. Label, sample, and release
Cut samples from a representative section—not only the first meters after startup. Label rolls with resin lot, date, operator, target thickness/width, and any special notes. Hold rolls that fail thickness, width, optics, or seal checks instead of hoping converting will hide the problem.
Quality checkpoints that catch scrap early
Use this checkpoint ladder from upstream to downstream. Fix the earliest true cause; do not compensate forever at the winder.
Incoming and melt quality
Resin and masterbatch lots match the work order
Moisture-sensitive components were handled correctly
Melt is free of black specks, gels, and color streaks after purge
Melt pressure and motor load are stable at target speed
Bubble stability
Bubble diameter holds within a tight visual band
Frost line is level and at the agreed height
No breathing, dancing, or leaning into the cage
Guides contact lightly without scratching
Dimensional quality
Thickness profile around the circumference stays inside tolerance
Layflat width stays inside tolerance
Tube is not biased to one side
Roll footage/weight matches the order math
A practical manual thickness method: measure at least eight points around the tube with a micrometer, record min/max/average, and act when the range widens—not only when the average drifts.
Surface and converting quality
Haze/gloss acceptable for the SKU
No continuous die lines, scratches, or oil marks
Treatment level adequate if printing is required
Seals on a sample bag or seal bar meet the minimum peel/tear expectation for that film
Roll geometry
Common problems, likely causes, and first moves
<-------- Can Move Left or Right -------->
| Problem | Likely causes | First moves |
|---|
| Bubble unstable / breathes | Air drafts, frost line too high, uneven cooling, surge from extruder | Close doors, rebalance air ring, lower frost line slightly, stabilize screw speed |
| Gauge bands / thick-thin rings | Dirty die lips, uneven die temperature, poor air distribution, worn hardware | Clean die, verify zone temps, check air-ring concentricity |
| Gels and holes | Contamination, degraded resin, wet additives, screen pack loaded | Purge, refresh filter, review drying and regrind percent |
| Wrinkles in layflat | Misaligned collapsing frame, uneven cooling, width hunting | Align frames, stabilize diameter, reduce late air changes |
| Blocking in the roll | Winding tension too high, insufficient antiblock, winding too hot | Lower tension, confirm additive package, allow more cooling |
| Weak seals | Wrong resin/blend, too much slip bloom, thickness too low in seal area | Revisit recipe, check thickness at seal region, adjust seal trial window |
| Low output with high pressure | Cold spots, blocked screen, wrong screw for resin | Verify heats, change screen, reduce unreasonable speed targets |
The pattern behind the table: most “mystery” film defects are mass-balance, temperature, cleanliness, or cooling problems that started earlier than the station where someone noticed them.
Trade-offs you should decide on purpose
Blowing film always forces choices. Make them explicit.
Clarity vs toughness: higher LDPE content and gentler orientation can help optics; LLDPE and higher orientation often help abuse resistance.
Thin gauge vs process window: thinner film improves yield but narrows the stable bubble window and exposes every die or air-ring fault.
High BUR vs tower limits: more transverse orientation can help balance properties, but only if the tower, cage, and cooling can hold the bubble.
Regrind percent vs appearance: regrind lowers cost and waste, yet raises gel and color risk if not filtered and dosed carefully.
Manual control vs automation: hand control teaches the process and can run simple SKUs; closed-loop thickness, gravimetric dosing, and stable winding protect margins when orders get tighter.
A good production standard is not “perfect film.” It is a film that meets the written specification with a process window wide enough for a full shift.
Where production equipment fits as the faster path
You can learn and even demonstrate blowing film with careful manual control: weigh resin, set heats, form a tube, inflate to a measured diameter, cool, haul off, and wind. That path proves the method.
When the goal shifts from learning to repeating orders at commercial width and thickness, a dedicated blown film line becomes the faster path because it keeps the same steps continuous:
Metered extrusion instead of ad-hoc feeding
A circular die and air ring designed to hold a stable bubble
Haul-off and winding that maintain tension for full rolls
Optional multilayer capability when one polymer layer is no longer enough
For plants that need stronger or more printable bag film than a basic mono-layer setup provides, a two-extruder co-extrusion arrangement is a common next step. Polyextruder's 2 Layer Co-extrusion Blown Film Machine is one example of that production path: publicly described as a two-extruder co-extrusion line with a rotating die head and wind-cooling ring for high- and low-density polyethylene bag film, aimed at uses such as garbage-bag and shopping-bag film. Treat those details as manufacturer-stated capabilities and confirm the exact screw sizes, width range, and output against your order mix before purchase or acceptance testing.
The important point for process discipline: equipment does not replace the method. It shortens the time between a correct recipe and a releasable roll. If resin prep, BUR/DDR math, frost-line control, and checkpoint discipline are weak, a faster line mainly produces scrap faster.
A practical startup checklist you can run tomorrow
Use this as a shift-ready sequence:
Confirm work order: resin recipe, thickness, layflat, roll size, special tests.
Inspect die lips, air ring, screens, collapsing frames, and winder cores.
Heat and soak all zones; verify utilities.
Load blended resin; record lot numbers.
Purge to clean melt at low screw speed.
Form the tube; set initial air and haul-off.
Stabilize bubble diameter and frost-line height before chasing thickness.
Micrometer the profile; adjust output/haul-off/air in small steps only.
Collect first-article samples for width, thickness, optics, and seal checks.
Release winding settings only after the roll build looks right end-to-end.
Label rolls and park any out-of-spec material in hold.
If a checkpoint fails, stop escalating speed. Return to the earliest upstream cause on the list.
What “done” looks like
You have completed a competent blowing film run when:
The bubble stays stable for a sustained period without constant hand rescue
Average thickness and layflat sit inside the order tolerance
Circumferential thickness range is controlled enough for converting
Rolls are round, labeled, and free of obvious ridges or telescoping
A sample passes the mechanical or seal check that matters for that SKU
The process settings are written down so the next shift can reproduce them
Blowing film rewards operators who treat air, heat, mass flow, and tension as one system. Master that system first—with or without advanced automation—then use production machinery to run it longer, wider, and with less variation.

 HOT LINE: 0086-13757718535